Preparing for Urbit-BTC integration with a Pi full node
Note: Urbit’s Bitcoin wallet was launched in May 2021. You can learn how to use it here
| Late 2021 Note: *Urbit’s Bitcoin wallet was launched in May 2021. You can learn how to use it here. You are also encouraged to use an Umbrel with the Urbit Bitcoin Connector app for a significantly simpler setup. |
|---|
Introduction
As you may have heard, Urbit is due to receive support for Bitcoin in th near future. Thanks to the efforts of ~timluc-miptev in fulfilling a bounty for an Urbit-native bitcoin wallet and RPC support – a suite called btc-agents – you will be able to send and receive bitcoin with other pilots on the network, by connecting your ship to a provider, which itself is connected to a bitcoin full node running the Electrs rustlang Electrum Server implementation.
Be sure to check out the previous interview linked above for context and details about these tools. For a quick overview of what you can expect, here are the requirements for the project from the bounty proposal:
- Ships can send payment in Bitcoin to other ships.
- Ships can send payment in Bitcoin to addresses.
- Ships can connect to full nodes that they run on their own.
- Ships can connect to full nodes operated by other ships.
- Private keys are never entrusted to any other entity.
- Ships can view the transaction history for any Bitcoin account they own.
- Ships can view the balance of any Bitcoin account they own.
After interviewing ~timluc about his work and being inspired by the efforts of ~nalytc-wornes and the smol computing community at ~dasfeb/smol-computers, I decided to expend some time and resources on putting together the requisite software and documenting the processes (and my missteps along the way) for the benefit of others who’d like to follow suit. Be assured, this is totally possible with a small, cheap computer and a few days of fiddling over SSH (though it took me the better part of a month to get everything working). Also note: I did not use an RPi4, but you could probably follow most of these directions to do so.
The promise of bitcoin support on urbit is meshing the financial freedom of cryptocurrency with the true ownership of digital identity provided by urbit. The utility of programmable money is made more real by connecting BTC to the social layer of urbit address space; this is the prospect I find most exciting. Smart contracts may have gotten there first, but urbit allows for decentralized financial warrens – private, personally computed conditions and rules for interacting with blockchains, which aren’t exposed to the world in the same way as an ETH contract.
Before we begin, a reminder: Bitcoin support has not yet been released! This is preparation for the day it happens. Your ability to issue commands will be via command line. You won’t be able to control your full node via the Landscape UI just yet – this is all dojo, baby – but when the day comes, you’ll be ready to roll. Alternatively, if you pilot a ship under ~matwet, you can look forward to service from this full node in the future!
(Many thanks once again to ~timluc-miptev for his patient assistance in getting things working on my end.)
Hardware
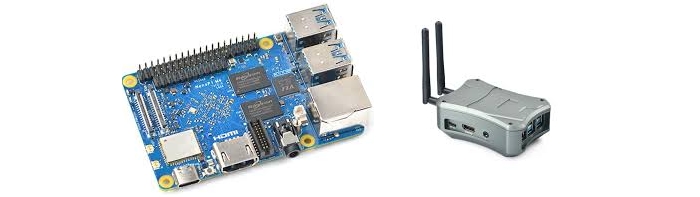
Thanks to the suggestion of ~naltyc-wornes, I decided to opt for a NanoPi M4V2 to run my full node. This little guy is a bit beefier than an RPi, which comes in handy when you’re doing something as CPU-intensive as block verification:
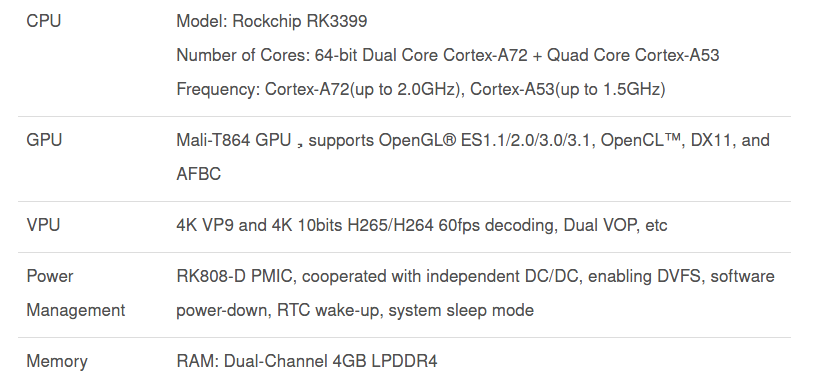
Since this is a tiny computer, you would be right to assume that the processor is ARM. The Cortex A72 supports ARMv8, but for whatever reason I believe the OS image I used ended up only supporting ARMv7 – I unwittingly used a 32-bit OS image, which may be the reason. This did not really get in the way, but if I were doing it over, I would probably go with 64-bit.
The FriendlyARM page linked above includes a few optional peripherals; I got the metal case with SSD hat, as well as the power adapter. The SSD hat is critical – you will also need a 1TB M.2 SSD to store the currently ~330GB Bitcoin blockchain. Go ahead and grab a MicroSD card and reader for the boot disk as well if you don’t already have one.
In addition to the above, I also purchased a 6 foot USB-C cable rated for 5A, and a pivoting camera mount – the metal case for the M4V2 includes a 1/4" screw hole that allows you to mount it. This became more important than I expected, because it turns out that the fan on the NanoPi case is extremely loud! This can be addressed by turning it on its side – not only does heat dissipate faster, but the mechanical noise of the fan is diminished substantially. In the end, I clamped the Pi to my desk and stood it up behind my monitor.
For a quick breakdown on expenses:
| Item | Cost |
|---|---|
| NanoPi M4V2 | $80 |
| Metal case + SSD hat (add-on) | $28 |
| 5V 4A power supply (add on) | $9 |
| 1TB WD Blue M.2 SSD | $104 |
| 32GB MicroSD | $12 |
| 6Ft 5A USB-C (2x) | $15 |
| Pivoting camera mount w/ clamp | $14 |
| Total (not incl. shipping) | $262 |
Please note that this doesn’t need to be quite this expensive – you really only need the Pi, power supply, SSD, SSD hat, and SD card, and you may have some of those already lying around. Here is where I also need to thank my lovely girlfriend for buying the NanoPi for me as a birthday gift – she has always been patiently supportive of me and my weird hobbies she doesn’t care about.
In terms of assembly, this was not terribly difficult, though I probably should have looked at the directions since I had to take it apart twice to fix the things I did wrong – specifically:
-
I did not realize that the little square sticker-looking thing was heat paste, and was supposed to be placed in the small square indentation above the processor’s resting spot
-
I screwed the main board down with regular tiny screws, instead of the included spacers; the tiny screws were for mounting the SSD hat to the spacers
-
I did not initially attach the the wifi antennae to the board – this is probably easier if you do it before screwing it down. You will need to attach the tiny IPX connectors to the board by pressing them straight down on the designated spots until they click.
One bit that made me nervous was (re)seating the SSD hat – it requires a bit of effort to push it down firmly enough onto the pins, to the point that I was worried about bending them. This didn’t happen despite removing and reseating it a couple of times, though, and I definitely found it easier to do with the board screwed down to the case.
Eventually everything was put together and in working order:
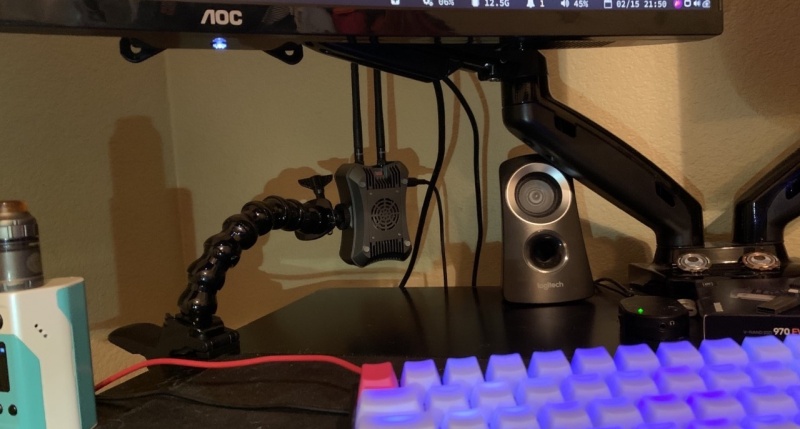
I still have this thing on wifi – I should probably plug it in for the sake of latency, but that feels a little less cool.
The stack
Let’s have an overview of the pieces of this system:
-
There are several OS images available – I ended up using Lubuntu 16.04, after experimenting briefly with the other available Linux distros. As I mentioned previously, this ended up being a 32-bit image – this didn’t end up preventing me from getting anything working, but it does prevent you from running Urbit on the same device, or allocating more than the provided 4GB of memory.
-
bitcoindis the Bitcoin Core daemon, which syncs and checks the blockchain, and performs transactions for you. Running abitcoindfull node makes you an independent node on Bitcoin’s network – you will not need to connect to somebody else’s server in order to interact with the network, but rather simply announce your operations to the rest of the network as a peer. -
electrsis an implementation of Electrum Server in the Rust language – Rust is a relatively new language used for software demanding high performance and strong safety, and is meant to stand in the place of languages like C. The original Electrum and its successor are written in Python, which has significantly higher resource overhead and slower performance. For our purposes, it is a necessary mediator betweenbitcoindand Urbit’sbtc-providerapplication. -
nodejsis a popular Javascript framework commonly used for web development. We are going to be using it as a simple reverse proxy to act as an API forelectrs. -
btc-agentsis a suite of backend software for Urbit’s Bitcoin support. It containsbtc-wallet, which manages your Bitcoin wallets, andbtc-provider, which communicates with a full node via a ship (yours or someone else’s).
The first three should all be running on the same device, in our case the pi – the last can run on whatever device your ship is on.
Plugging things in
You’ll need to flash the SD card with your OS image of choice; I like using balenaEtcher for this purpose, because it’s a simple tool that will perform error checking once it’s finished copying.
Next, hook up your pi to an ethernet cable and plug it in! You can optionally use a keyboard and monitor, but I just did everything over SSH. Check your router’s local network or do a ping scan to determine the IP address assigned to your pi, then connect over SSH with the username pi, password pi.
SSH config
Once you’re connected or plugged in, first things first, let’s change that default password!
- $> passwd
Give yourself something decent – this is potentially a high-value device!
Let’s change the root password while we’re at it (the default is fa):
- $> sudo passwd root
Now let’s configure SSH pubkey authentication. If you don’t have one already, go ahead and generate an SSH key, then on your local device like your desktop, run:
- $> ssh-copy-id pi@nanopi.ip.address.here
Now, on your pi, run the following:
- $> sudo nano /etc/ssh/sshd_config
This will drop you into a text editor with the configuration file for your SSH server opened; find the line that says PasswordAuthentication and change it to no, and find the line that says PubkeyAuthentication and make sure it says yes.
Press ctrl-o, ctrl-x to save and exit. Enter the following at the command line to restart the SSH daemon:
- $> sudo systemctl restart ssh
Get back on your other computer, and try connecting via SSH again:
- $> ssh pi@nanopi.ip.address.here
You should be dropped right into a terminal without being prompted for the password. Nobody can connect to this pi without your keypair, so make sure to keep it safe.
Let’s give our pi a cute name while we’re here:
- $> sudo hostname shrine
Obviously this can be whatever you want.
Port forwarding
bitcoind uses TCP port 8332 to communicate with the rest of the network by default – you will need to forward that port to your pi on your router. This process is specific to your router’s model or manufacturer, but it’s not very hard – you can find instructions here.
Mounting your SSD
If your SSD is already hooked up, you will first need to partition, format, and mount it. Don’t worry if you’ve never done this before, because it’s not difficult. Find the device ID using the following command:
- $> sudo blkid
This will list available devices, along with associated attributes. Look for the entry that is a 1TB drive – in my case, the device was named nvme0n1. Let’s go ahead and create a partition:
- $> sudo fdisk /dev/nvme0n1
You will be prompted with a menu of options: press p to create a primary partition, then press 1 to give it a number. Once completed, enter:
- $> sudo blkid -f
To view the name of the name partition – in my case, /dev/nvme0n1p1. Now, let’s format the new partition in EXT4 and mount it with the label bitcoin:
- $> sudo mkfs -t ext4 /dev/nvme0n1p1
- $> sudo mount /dev/nvme0n1p1 /mnt/bitcoin
You’re now able to cd into your SSD just like any other directory.
Let’s make our pi automatically mount the partition on startup by editing the fstab file.
- $> sudo nano /etc/fstab
Enter a new line at the end, and use the following:
/dev/nvme0n1p1 /mnt/bitcoin ext4 defaults,auto,users,rw,nofail 0 0
Reboot your pi to test it; you should be able to immediately interact with /mnt/bitcoin once you’re back in a terminal.
bitcoind
Next up, let’s get the requisite software installed or downloaded. Let’s grab bitcoin first:
- $> sudo apt install curl
- $> curl https://bitcoin.org/bin/bitcoin-core-0.21.0/bitcoin-0.21.0-arm-linux-gnueabihf.tar.gz | tar xvz
(Note that this URL is for 32-bit ARM binaries – 64-bit binary download links are available here.)
Let’s copy the contents into /usr/local/bin for ease of access:
- $> sudo cp -a bitcoin-0.21.0/bin/. /usr/local/bin
This will come in handy so we don’t have to type the full path to the binaries in the future. Test it out:
- $> bitcoind
This should print the help menu for the bitcoind binary.
Let’s go ahead and get started on syncing the blockchain – this will take a long time, at least a day – you will have to download 300GB+ of data and build an index. We’ll do this in a tmux window so we can leave it in on the background while we work:
- $> sudo apt install tmux
- $> tmux new -s btc
- $> mkdir /mnt/bitcoin/BTC
- $> bitcoind -datadir=/mnt/bitcoin/BTC -blockfilterindex -txindex -server
Press ctrl-b, d to detach from your tmux window. You can reattach with:
- $> tmux a -t btc
You can check on its progress periodically with this command:
- $> bitcoin-cli -datadir=/mnt/bitcoin/BTC getblockcount
Compare the number it prints to the ‘Height’ on this web page – this is the current block height of the BTC blockchain. Once the two numbers are equal, you are fully synced.
Rust & electrs
Next up is Rust:
- $> curl --proto '=https' --tlsv1.2 -sSf https://sh.rustup.rs | sh
This will run the installer script for Rust – don’t slam through the defaults, we need to specify the architecture. Press ‘2’ at the first prompt, then enter the host triple armv7-unknown-linux-gnueabihf, and choose stable & default.
Now let’s download electrs and compile it:
- $> sudo apt install git cargo
- $> source $HOME/.cargo/env
- $> git clone https://github.com/romanz/electrs
- $> git submodule init
- $> git submodule update
- $> cd electrs
- $> sudo apt update && sudo apt install clang cmake build-essential
- $> cargo build --locked --release
If all goes well, you should have some binaries waiting for you. Test it out:
- $> ./target/release/electrs --help
This should print the help menu for electrs.
Node
Finally, nodejs and npm – we’re going to install it from the Node site instead of the repos, because they tend to be a bit out of date. Go find the latest ARMv7 link here.
- $> sudo apt install wget
- $> wget -c https://nodejs.org/dist/v14.16.0/node-v14.16.0-linux-armv7l.tar.xz
- $> tar xvf node-v14.16.0-linux-armv7l.tar.xz
- $> cd node-v14.16.0-linux-armv7l
- $> sudo cp -R * /usr/local/
- $>
You can test to make sure it’s installed:
- $> npm -v
This will print the npm version number.
RPC utils
~timluc-miptev has put together some instructions and scripts that would have saved me a lot of time had I seen them before spending a week piecing things together myself; go ahead and clone his repo and check out the readme:
- $> git clone https://github.com/timlucmiptev/urbit-bitcoin-rpc
- $> cd urbit-bitcoin-rpc
- $> cp bitcoin.conf /mnt/bitcoin/BTC/bitcoin.conf
Now let’s edit the script used to start this chain of software:
- $> nano mainnet-start.sh
Edit the first non-commented-out line, so that it says:
DRIVE=/mnt/bitcoin
Setting this variable will tell the rest of the script where to find your bitcoin data.
Spinning up
Now that everything is installed and in place, all you need to do is run the mainnet-start script. First, kill your existing bitcoind process by opening your tmux window:
- $> tmux a -t btc
…and pressing ctrl-c. It will take a few moments to shut down. Enter exit to close the window.
Now execute the startup script:
- $> cd ~/urbit-bitcoin-rpc
- $> npm install express
- $> ./mainnet-start.sh
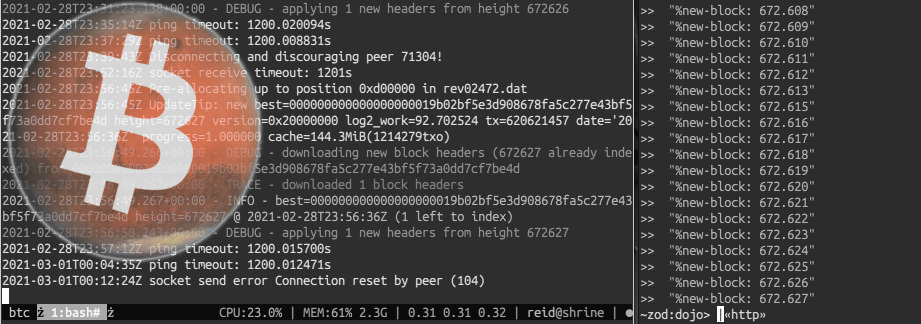
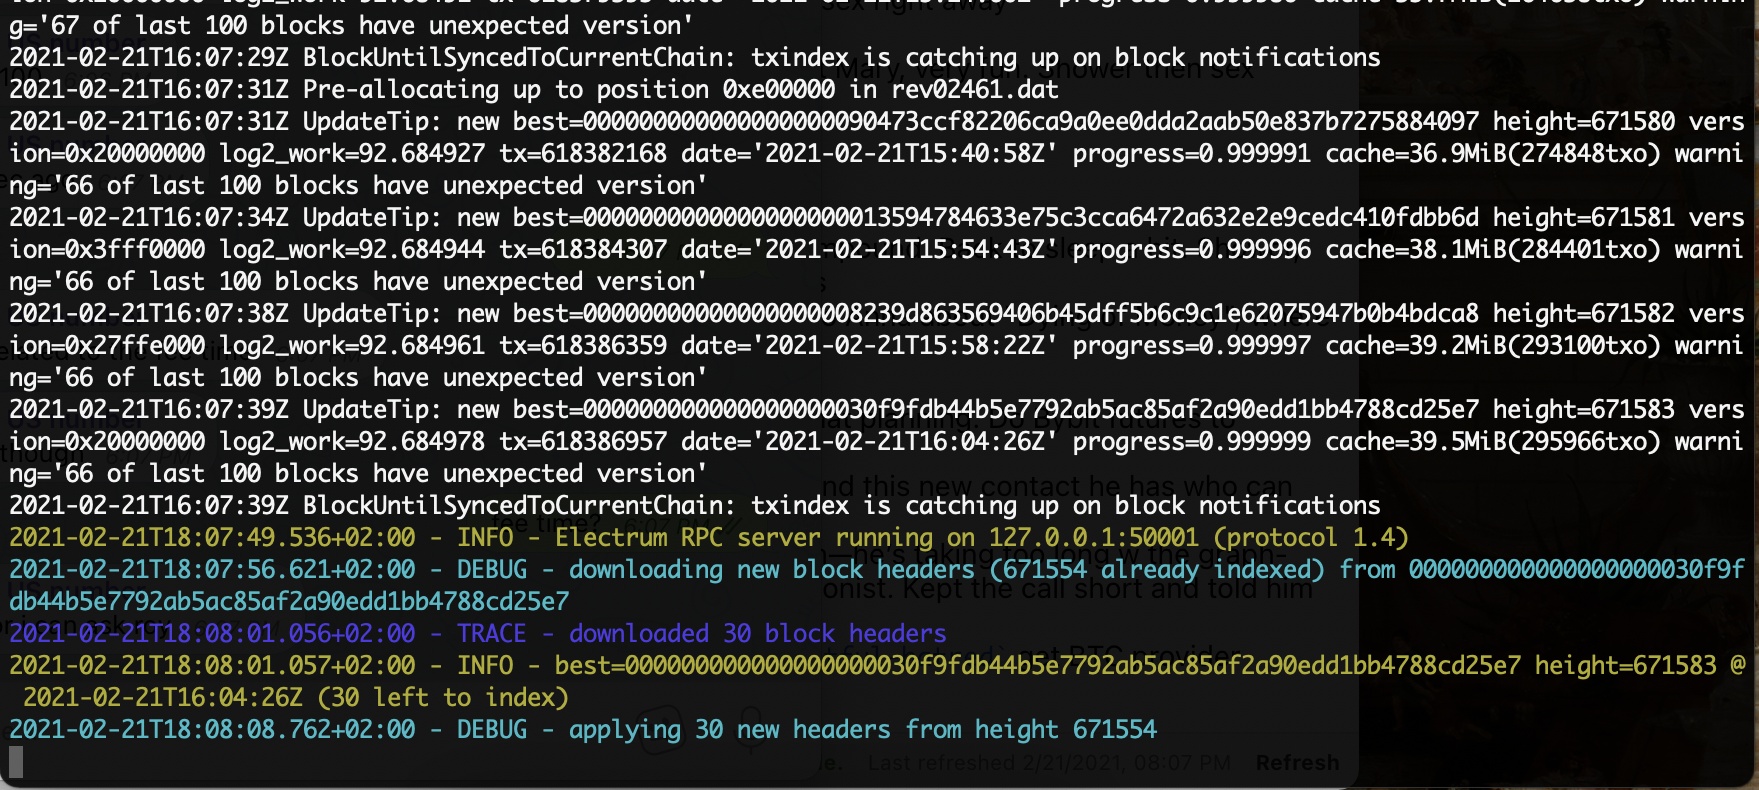
You will see some debug output churn for a while – once you see yellow text that reads Electrum RPC server running on 127.0.0.1:50001, that means you’re good to go:
You can test electrs and the node proxy by curling a wallet query:
- $> curl http://localhost:50002/addresses/info/bc1qm7cegwfd0pvv9ypvz5nhstage00xkxevtrpshc
This should print some JSON with info about the address in the URL.
Urbit installation
Final steps! Let’s spin up a fakezod, clone ~timluc’s repo and do this:
- $> urbit -F zod
Continuing:
- ~sampel-palnet:dojo> =provider ~sampel
- ~sampel-palnet:dojo> =network %main
- ~sampel-palnet:dojo> |rein %bitcoin [& %btc-provider]
- ~sampel-palnet:dojo> :btc-provider +bitcoin!btc-provider/command [%set-credentials api-url='http://addresshere' network]
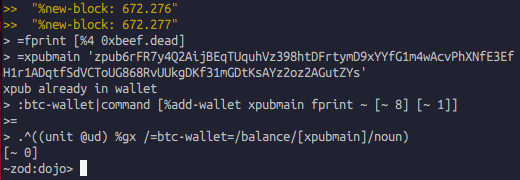
You should start seeing a spinning http indicator at the prompt, and eventually yellow text announcing new blocks!
Let’s keep using the test commands from the readme:
- ~sampel-palnet:dojo> =fprint [%4 0xbeef.dead]
- dojo> =xpubmain 'zpub6rFR7y4Q2AijBEqTUquhVz398htDFrtymD9xYYfG1m4wAcvPhXNfE3EfH1r1ADqtfSdVCToUG868RvUUkgDKf31mGDtKsAYz2oz2AGutZYs'
- dojo> :btc-provider +bitcoin!btc-provider/command [%add-wallet xpubmain fprint ~ [~ 8] [~ 1]]
- dojo> .^((unit @ud) %gx /=btc-wallet=/balance/[xpubmain]/noun)
This should print out the balance of the test wallet (which is 0).
You’ve made it! In the future, you should only need to update the existing software on this pi to make it a provider for your ship.
Recall that this is still pre-release software! You won’t be able to control your wallets from within Landscape yet. You can modify the above commands, or check out the source code to get a better idea of what you can do from the dojo. Update Oct 2021: This is now production software enabled by default on all Urbit ships.
Conclusion
If you lose power or restart your pi, you can restart the full node stack by starting the mainnet-start.sh script. I tried putzing around with systemd modules but just ended up breaking stuff; these will probably be part of a future iteration anyway.
In all, this process took me about three weeks to complete (mostly dragged out by tinkering on weekends and a couple of mishaps that required re-indexing). Knowing what I know now, it would probably take a couple of days to start over from scratch, mostly taken up by downloading and indexing 300+ GB of blockchain – if you already have a copy, this shouldn’t take more than an afternoon. Hopefully my stumbles will help you avoid my mistakes.
External links
This post is also available on Urbit, where you can post comments. Join ~matwet/networked-subject and open the Networked Subject notebook. Boot a free comet or Buy a planet with Bitcoin .
.