Self-hosting MinIO S3 for Urbit

Background
This tutorial will walk you through the process of configuring MinIO on your server, which will allow you to host images and content for your ship, but without relying on or paying for a third party host.
S3 is a service offered by Amazon’s web service division that allows you to cheaply host data that you can programatically access with other applications. S3 is wildly popular, and as a result has an API that is widely supported by a lot of software. Other companies also offer services that can use the same API as Amazon’s service.
Urbit has support for S3-compatible APIs – we previously covered how to use DigitalOcean’s S3 service, Spaces. Think of this as sticking a big external hard drive onto your ship, that allows you to upload images and data from inside of Landscape, the web UI.
MinIO is a highly performant, S3-compatible object storage application, with both client and server binaries. Most importantly, it’s open source software that you can run yourself on the server hosting your ship, and you don’t have to pay additional fees to DO or Amazon. This tutorial will assume you are using Ubuntu, but the instructions should not deviate much across OSes.
An important qualification: S3 requires a subdomain that matches your bucket name, and Urbit’s implementation requires https, so you will need to have a domain to generate certificates for – fortunately, if you’re using a planet, you can use a free arvo.network subdomain. If you have your own domain, I believe you can substitute ‘sampel-palnet’ throughout this tutorial with a subdomain of your choice, though I wasn’t able to fully test this due to my particular setup.
All credit is due once again to ~socsel-pacted for the heads-up, and for figuring this out!
Edit: You can find alternate instructions by ~tomnyr-tirsyr here.
Server prep
As I mentioned, you’ll need to have your planet set up with a domain for https – if you haven’t already done so, you can register your ship’s IP on arvo.network with the following command in dojo (replacing 1.2.3.4 with your IP – make sure you have a period in front of it):
- ~sampel-palnet:dojo> -dns-address &dns-address [%if .1.2.3.4]
(In this and all tutorials, dojo> indicates your urbit’s command line, and $> denotes your computer or server’s).
Unfortunately, it may take a few days for this to go into effect if you don’t already have this set up – registering these subdomains is a manual process as far as I know, running the command just registers a request. You’ll be able to tell it has worked when navigating to sampel-palnet.arvo.network (with your planet name) pulls up your ship.
While we’re setting up, make sure port 9000 is accessible. On your server, you can run:
- $> sudo ufw allow 9000/tcp
If you’re using an Oracle VPS, create a TCP ingress rule that allows port 9000.
Installation & TLS
Once you’ve gotten everything prepared, let’s run certbot to generate a TLS certificate. First, shut down your urbit or any running web server to free up port 80, then install and run certbot:
- $> sudo apt install certbot
- $> sudo certbot certonly --standalone
Follow the instructions to generate your certificates; when prompted, enter sampel-palnet.arvo.network, substituting your ship’s name. Once completed, you can find them in /etc/letsencrypt/live/sampel-palnet.arvo.network.
Now, let’s download and run Minio so we can manipulate its configuration:
- $> cd
- $> wget https://dl.min.io/server/minio/release/linux-amd64/minio
- $> chmod +x minio
- $> ./minio
This should print the help menu. Now we can copy our certificates into the appropriate folders:
- $> mkdir ~/.minio && mkdir ~/.minio/certs
- $> sudo cp /etc/letsencrypt/live/sampel-palnet.arvo.network/fullchain.pem ~/.minio/certs/public.crt
- $> sudo cp /etc/letsencrypt/live/sampel-palnet.arvo.network/privkey.pem ~/.minio/certs/private.key
- $> sudo chown user:user .minio/certs/public.crt
- $> sudo chown user:user .minio/certs/private.key
(replace user:user with your username on this device – i.e. jsmith:jsmith).
Now let’s set environment variables for Minio’s access and secret keys (basically username/password). First, let’s generate a nice strong password:
- $> openssl rand -base64 18
This will spit out a long random string. Copy it and paste it in the first following command, and set the second one to whatever you’d like:
- $> export MINIO_SECRET_KEY=yourlongrandomstringhere
- $> export MINIO_ACCESS_KEY=loginname
Similarly, let’s go ahead and set the root login the same way:
- $> export MINIO_ROOT_USER=your_root_username
- $> export MINIO_ROOT_PASSWORD=anotherstrongpassword
Think of this as writing down your credentials on a post-it note for your programs to look at. Now let’s make a folder for our minio to put data in:
- $> mkdir minio-data/sampel-palnet
- $> ./minio server minio-data/sampel-palnet
And finally, launch minio (after spawning a tmux window to hide it in):
- $> tmux new -s minio
- $> ./minio server ~/minio-data/sampel-palnet
[You may recall this trick for hiding your urbit’s command line – you can hide this window by pressing ctrl-b followed by d; this will leave it running in the background. You can bring it back to the fore by entering: $> tmux a -t minio]
If it worked, you should see something like this:
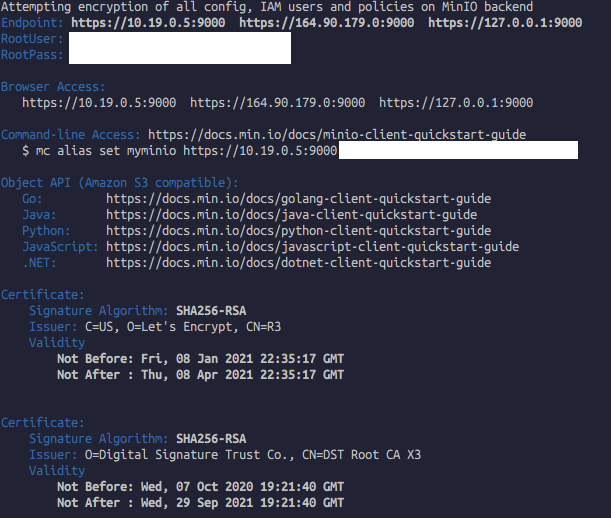
Note the certificate information at the bottom; this means it is serving over https.
Bucket configuration
Let’s open up the control panel:
https://sampel-palnet.arvo.network:9000
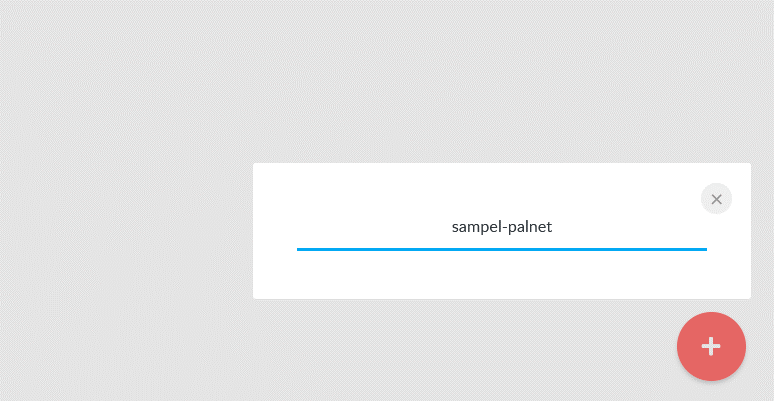
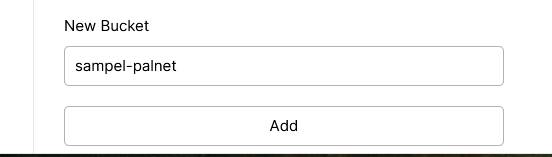
Login with the access and secret keys you set previously. Once logged in, click the + icon at the bottom right to create a new bucket. The bucket name has to be the same as your subdomain (i.e, sampel-palnet):
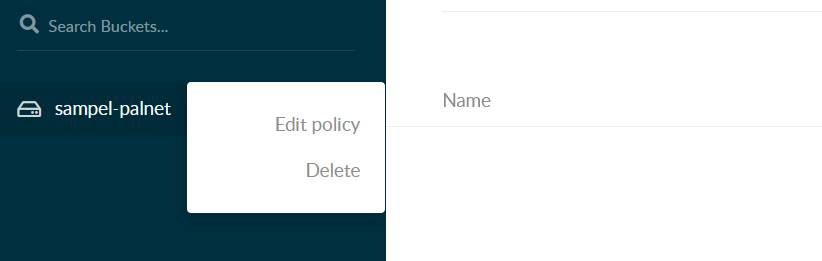
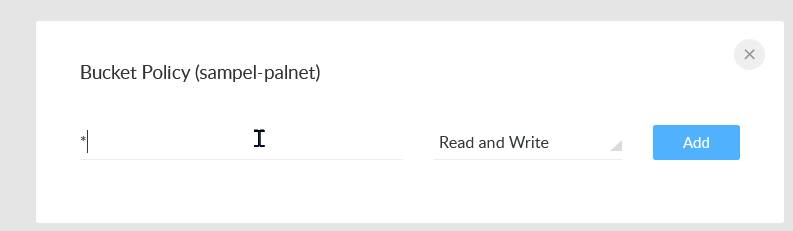
Now, in the left sidebar, click the icon on the right to edit the access policy. Enter * in the text field and select ‘read & write’.
Urbit configuration
Finally, lets return to our ship. Go to Landscape and click your name at the top right, then go to ‘ship settings’ in the left sidebar. Scroll down to ‘S3 credentials’.
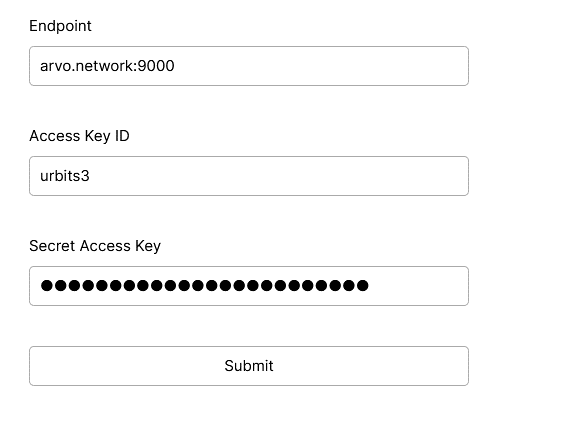
Enter arvo.network:9000 as your endpoint (not your subdomain), and enter the credentials we set earlier. Beneath, under ‘S3 buckets’, enter sampel-palnet – if you are using a personal domain rather than arvo.network, note that this must match the subdomain.
Click save, go to Options -> Activate next to the name of the bucket, and you have completed this tutorial! Head over to a chat and look in the text field you type into – there should be a paperclip icon on the right. Click it to add attachments.
I hope you found this useful; thanks again to ~socsel for the assistance. If you run into any difficulties, feel free to reach out in the chat room at ~matwet/networked-subject.
This post is also available on Urbit, where you can post comments. Join ~matwet/networked-subject and open the Networked Subject notebook. Boot a free comet or Buy a planet with Bitcoin .
.