Free Urbit hosting with Oracle Cloud
| Late 2021 Note: Oracle now offers a significantly more powerful free-tier package, with up to 4 ARM CPU cores 24GB memory, but availability is limited and difficult to get. The instructions remain largely the same, except that you need to choose Ampere instances, use an Ubuntu default image, and install ARM binaries for the applications |
|---|
Background
The two main options for running your Urbit are either to host it on a PC you have at home, or to host it in the cloud in a datacenter. The latter option is appealing thanks to high availability and good connection speed, along with the fact that most people don’t have a Linux or Mac computer at home that is always on. A server usually costs a little bit of money, though – typically on the order of 5-10USD/month.
This evening a comet in the urbit-community watercooler chat let everyone know that they had successfully used the Oracle Cloud VM free tier to host an Urbit without fees. This means we can get the advantages of a hosted ship without the costs associated with most providers. Boot a comet on here, and you’ve got a totally free cloud-hosted introduction to Urbit! After testing it, I can say that the performance of the VM is more than enough to handle an Urbit.
(Thanks, ~ricmed-tagmed-donlep-hodtec--dabreb-laclep-talpex-wanzod for the information, and ~socsel-pacted for the help!)
I decided to go through the process of setting up a comet and document the steps for the convenience of anybody who wishes to follow suit. This process will probably take about 30 minutes from registration to having a booted ship. This process is a little more complicated than other hosts I’ve used, like DigitalOcean (referral link).
You should know going in that upon registration, you will be required to provide a phone number and credit card for validation. That said, Oracle makes it pretty clear what is free and what is not, and you should not be able to trivially stumble into charging your card as far as I can tell. Just follow these directions closely.
Please keep in mind that while this is called ‘free forever’, you are relying on the generosity and discretion of a corporation with no formal business relationship to you. That shouldn’t stop you from giving this a spin, though.
The ‘always free tier’ of services includes the following:
- Two virtual machines with 1/8 OPCU and 1 GB memory each.
- 2 databases total, each with 1 OCPU and 20 GB storage (but you’ll need to learn to be an Oracle DBA :-)
- volumes with 100GB total, 10GB object, 10GB archive
- Load Balancer, 1 instance, 10 Mbps bandwidth.
- Monitoring, 500 million ingestion datapoints, 1 billion retrieval datapoints.
- Notifications, 1 million delivery options per month, 1,000 emails sent per month.
- Outbound Data Transfer, 10 TB per month.
- Is Oracle Cloud Free Tier available in all countries? Yes, Oracle Cloud Free Tier is currently available worldwide.
(h/t)
Since Oracle offers a free-tier S3-compatible storage API, I will update this tutorial with additional directions if it turns out to be compatible with Urbit’s S3 integration.
Creating an account & instance
First, navigate to this link, and click the ‘Try Oracle Cloud free tier’ button at the top right to proceed through the registration.
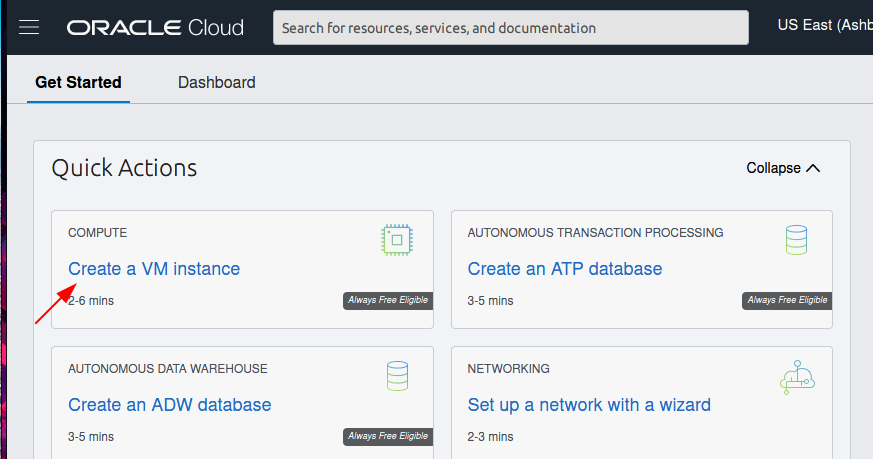
Once you have registered and validated your email, phone, and CC, you’ll get dropped into the dashboard. Click ‘Create a VM instance’:
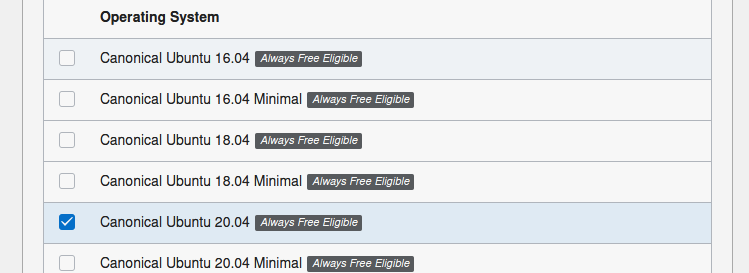
Feel free to give it whatever name you’d like. Click the ‘Edit’ link in the ‘Configure placement and hardware’ option box to change the image you’re using to Ubuntu – the version should not make a difference, but in this tutorial I used 20.04 standard.
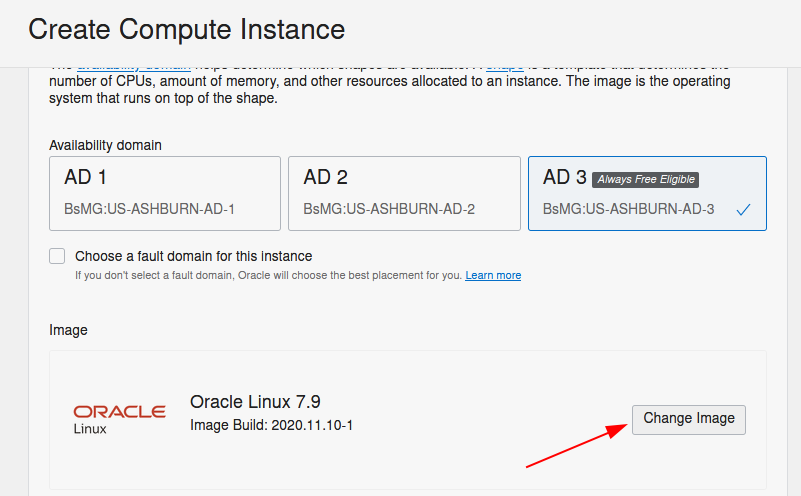
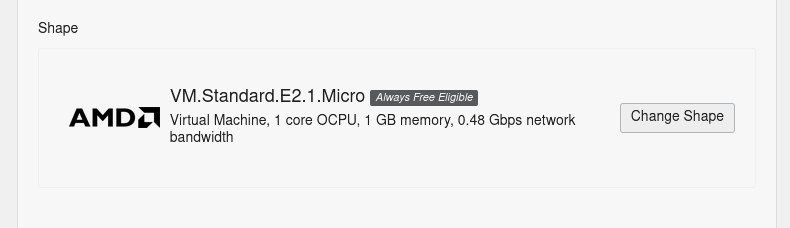
Make sure that your ‘shape’ retains the default setting (VM.Standard.E2.1.Micro)! This is the ‘free’ option.
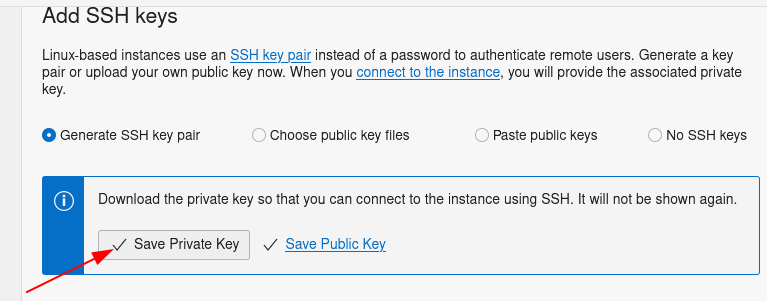
You will be given the option of using your own SSH keys if you’d like, but for the purposes of this tutorial, I will assume you do not have one or know how to create one. No problem, just keep ‘Generate SSH key pair’ selected, and download your private key.
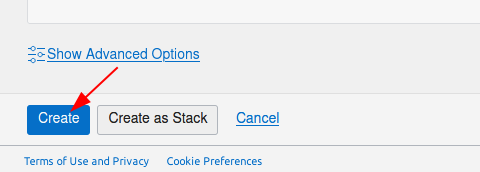
You can keep default options for the rest of this page. At the very bottom, click the ‘Create’ button (not the ‘Create as Stack’ button).
On the dashboard for your VM, take note of the public IP address. This is what we will use to connect to our server.
Congrats, you’ve spun up a Linux server! Now we’ll walk through connecting to it and configuring it to install Urbit.
Connecting
Here we will begin a little command-fu. Don’t worry if you’ve never used a command line before, because you can just copy-paste each line individually.
(Note that in the following commands, you do not need to type $> – it is only there to indicate a new command line.)
Connecting from a Linux, WSL or Mac PC
First, let’s copy our new SSH private key to the proper directory and change its permissions, then connect with it. You will need to edit the path in the first command to point at wherever your keyfile saved. For the third command, edit it to contain the IP address you saw in your VM dashboard a moment ago.
- $> mkdir ~/.ssh
- $> mv ~/Downloads/ssh-key-2020-12-19.key ~/.ssh/oracle.key
- $> sudo chmod 600 ~/.ssh/oracle.key
- $> ssh -i ~/.ssh/oracle.key ubuntu@your.ip.address.here
Note that the default user is ubuntu – if you did not select the same image at VM creation, this may be different.
Once you’ve entered the final command, you will be connected to your server and have control of a remote computer!
Connecting from a Windows PC
If you are using a Windows computer, connecting via SSH will require a little bit of extra work. If you already have WSL installed on your PC, you can use your Linux shell to SSH with the instructions above. If you don’t, it is probably quicker to simply connect using PuTTY.
You can follow the directions here to convert your .pem key to a format that PuTTY can use. After you’ve imported the private key, simply connect to your VM’s IP address using that key.
Configuring software
Oracle Cloud Ubuntu instances are totally locked down by default. We’ll need to allow port traffic through on port 80 for the instance, then disable the firewall rules.
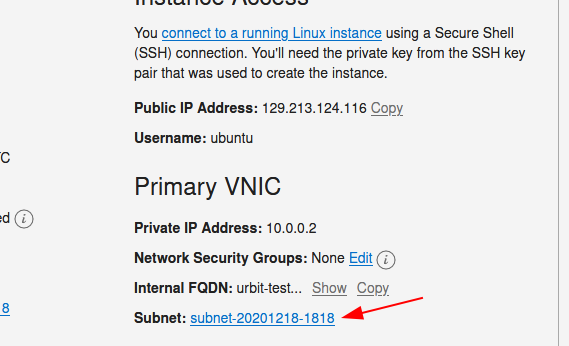
Go back to the instance details page for your VM and select the subnet link:
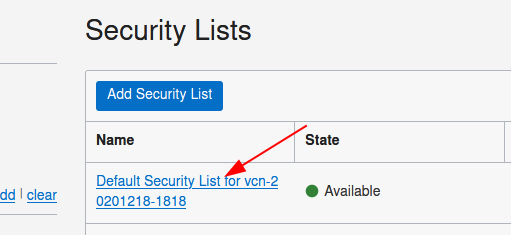
Click the default security list:
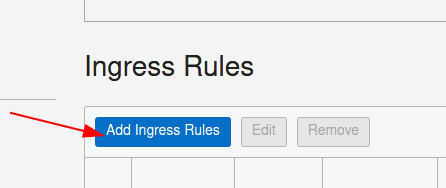
Add an ingress rule identical to the following one:
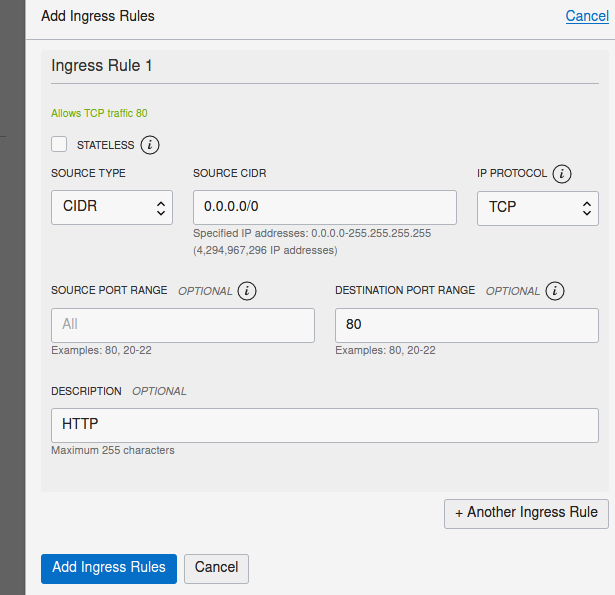
This will allow all traffic on port 80 to reach your Urbit. Go ahead and make another one identical to the one you just created, replacing 80 with 8080, just in case your ship doesn’t bind to 80 when you boot.
One more ingress rule: we will create a stateless rule to allow traffic on the UDP port that Ames will use. Make another rule like this, where ‘51234’ is any port between 50000-59999:
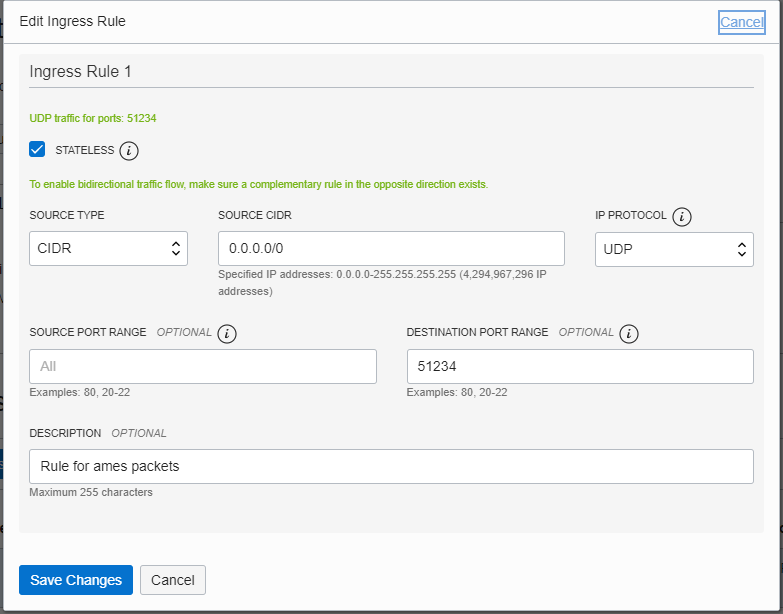
(h/t ~rigred-losrev)
Now return to your command line to disable iptables firewall rules on your server:
- $> sudo iptables -P INPUT ACCEPT
- $> sudo iptables -P OUTPUT ACCEPT
- $> sudo iptables -P FORWARD ACCEPT
- $> sudo iptables -F
- $> sudo iptables --flush
Urbit requires 2GB of memory available to boot, and this VM only has 1GB. No worries though, we can trick Urbit with a page file! This is simply allocating disk space as overflow memory. Unless you are doing something really heavy duty, your ship will only use a fraction of this.
- $> sudo fallocate -l 2G /swapfile
- $> sudo chmod 600 /swapfile
- $> sudo mkswap /swapfile
- $> sudo swapon /swapfile
- $> echo '/swapfile none swap sw 0 0' | sudo tee -a /etc/fstab
Next lets install tmux and create a new session for our urbit. Tmux will allow you to create windows you can detach from inside of your terminal, so you don’t have to kill your urbit process to do other things on the server:
- $> sudo apt install tmux
- $> tmux new -s urbit
When you need to escape your urbit command line, press: ctrl-b, followed by d – the first one tells tmux to listen for a command, and the second tells it to detach.
If you want to reattach to your urbit’s command line, enter the following:
- $> tmux a -t urbit
Installing Urbit
Now for the good stuff – let’s download and install Urbit on this server.
- $> cd && mkdir urbit
- $> cd urbit
- $> wget --content-disposition https://urbit.org/install/linux64/latest
- $> tar zxvf ./linux64.tgz --strip=1
- $> sudo apt-get install libcap2-bin
- $> sudo setcap 'cap_net_bind_service=+ep' ~/urbit/urbit
- $> ./urbit -p 51234 -c mycomet
These commands do the following:
- Make an urbit folder in your home directory and enter it
- Download the latest Linux Urbit binary and extract it
- Give the urbit binary permission to use port 80
- Launch a new comet in a folder named mycomet on the port you opened up on the firewall
If you’ve done everything correctly, you will see your comet mine an identity and download and compile its source code. This process took about 3 minutes for me, but it may be longer – identity mining is not predictable. When you boot this comet in the future, it should only take a few seconds.
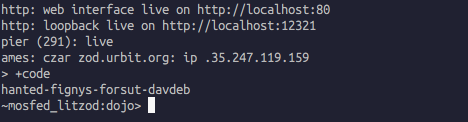
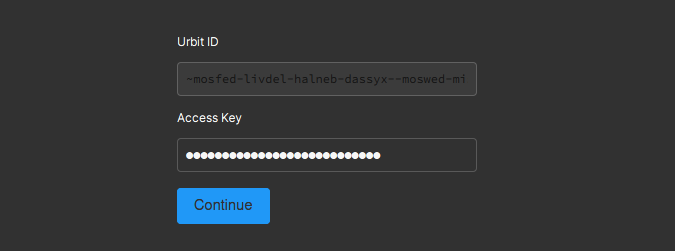
What a nice feeling, after all that prep it’s up and running! Enter +code in your Urbit terminal to get a login code like the one above.
Now, use your web browser to navigate to the IP address of your server, which you took note of earlier. It should present you with a login screen – enter the password that +code generated to log in.
Moving an existing pier to the cloud
If you already have a ship hosted on your PC, it’s very simple to transfer to another computer – you only have to copy the folder (‘pier’) over.
First, go ahead and get the binaries downloaded on your VM if you haven’t already done so:
- $> cd && mkdir urbit
- $> cd urbit
- $> wget --content-disposition https://urbit.org/install/linux64/latest
- $> tar zxvf ./linux64.tgz --strip=1
- $> sudo apt-get install libcap2-bin
- $> sudo setcap 'cap_net_bind_service=+ep' ~/urbit/urbit
Before copying your old pier, make sure your urbit is not running on your computer. You can exit with ctrl-d or ctrl-z in the dojo. Never try to run your urbit in two places at once, or it can de-sync from the network.
Next, run this monster of a one-liner on your local computer, after editing in the path to your local pier and IP address of the server:
- $> rsync --progress -avz -e "ssh -i ~/.ssh/oracle.key" /path/to/local_pier ubuntu@server.ip.address.here:~/urbit/
Now you just need to connect to your VM and run the Urbit binary, pointing at your newly copied pier:
- $> ssh -i ~/.ssh/oracle.key ubuntu@your.ip.address.here
- $> tmux new -s urbit
- $> ./urbit/urbit -p 51234 urbit/your_pier_here
Where ‘51234’ is whatever UDP port you created an ingress rule for earlier.
(On Windows/PuTTY, just repeat the previous process to connect to your server, and enter commands 2 & 3)
And that’s it!
Ship operation
Congratulations on successfully configuring a Linux server and booting an Urbit ship! You can use this comet like any other ship. Go ahead and run the following in your urbit’s dojo to receive the latest OTA update (comets do not get them automatically):
- ~sampel-palnet:dojo> |ota ~wanzod %kids
Give it 5 minutes or so to download and compile.
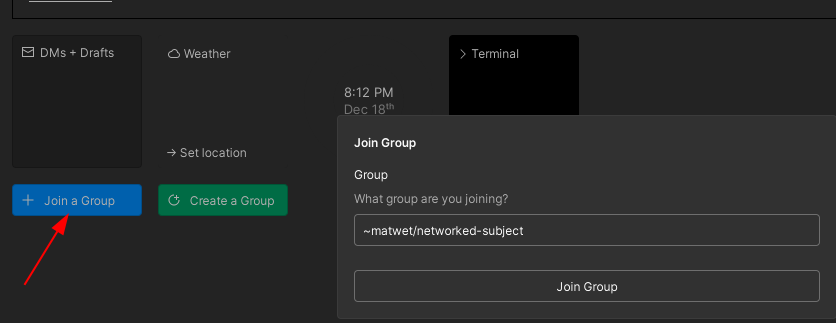
From here, your journey is a self-guided one. You can join groups and explore the network. Go ahead and join ~bitbet-bolbel/urbit-community and check out the chats and notebooks for addresses and descriptions of other groups you can join. Feel free to also join ~matwet/networked-subject to say hi and check out the meme channel, or give feedback on this or any tutorial.
Welcome to Mars.

Reference & Troubleshooting
If your ship does not load in your browser, double check the following: the port number your urbit is serving on (should be 80 or 8080 if nothing else is running on this VM – check the first couple of lines in your dojo output after boot); the VM ingress rules outlined above; the iptables configuration described previously.
To end your urbit process, press ctrl-d at the dojo.
To detach from your urbit tmux session, press ctrl-b, d.
Enter exit at the command line to fully exit your SSH session after you’ve detached from your tmux session.
To reconnect to your urbit’s command line, enter the following from your local command line, editing in your own IP address:
- $> ssh -i ~/.ssh/oracle.key ubuntu@your.ip.address.here
- $> tmux a -t urbit
See more official instructions for using your urbit here.
This post is also available on Urbit, where you can post comments. Join ~matwet/networked-subject and open the Networked Subject notebook. Boot a free comet or Buy a planet with Bitcoin .
.